前言
本文介绍在搭建了服务器并且配置了域名后,如何通过 Certbot 将原先的 http:// 域名配置为 https:// 域名。文章的最后介绍了 HTTPS 基于的 SSL 协议,以及和 SSL 加密通信过程类似的 SSH 协议。
环境准备
- Ubuntu 16.04
- Nginx
安装配置 Certbot
添加软件源:
1 | sudo apt-get update |
可以看到 /etc/apt/sources.list.d 目录下多了个 certbot-ubuntu-certbot-xenial.list 文件,内容如下:
1 | deb http://ppa.launchpad.net/certbot/certbot/ubuntu xenial main |
安装Certbot:
1 | sudo apt-get update |
使用如下命令自动配置Nginx服务,也可以加上 certonly 参数来手动配置nginx。
1 | sudo certbot --nginx |
出现如下文字,说明Certbot读取了nginx配置文件。默认回车选择所有:
1 | Which names would you like to activate HTTPS for? |
选择是否重定位到HTTPS:
1 | Please choose whether or not to redirect HTTP traffic to HTTPS, removing HTTP access. |
配置成功,有效期为90天,过期需要使用 certbot renew 更新新的证书。
1 | IMPORTANT NOTES: |
现在你可以通过HTTPS访问你的网站了。
我们查看一下Nginx配置文件,文件名对应你的域名,以 .conf 结尾,发现新增了如下内容:
1 | listen 443 ssl; # managed by Certbot |
说明Nginx在监听443端口,并将不是HTTPS的请求重定位到HTTPS。
协议原理
SSL
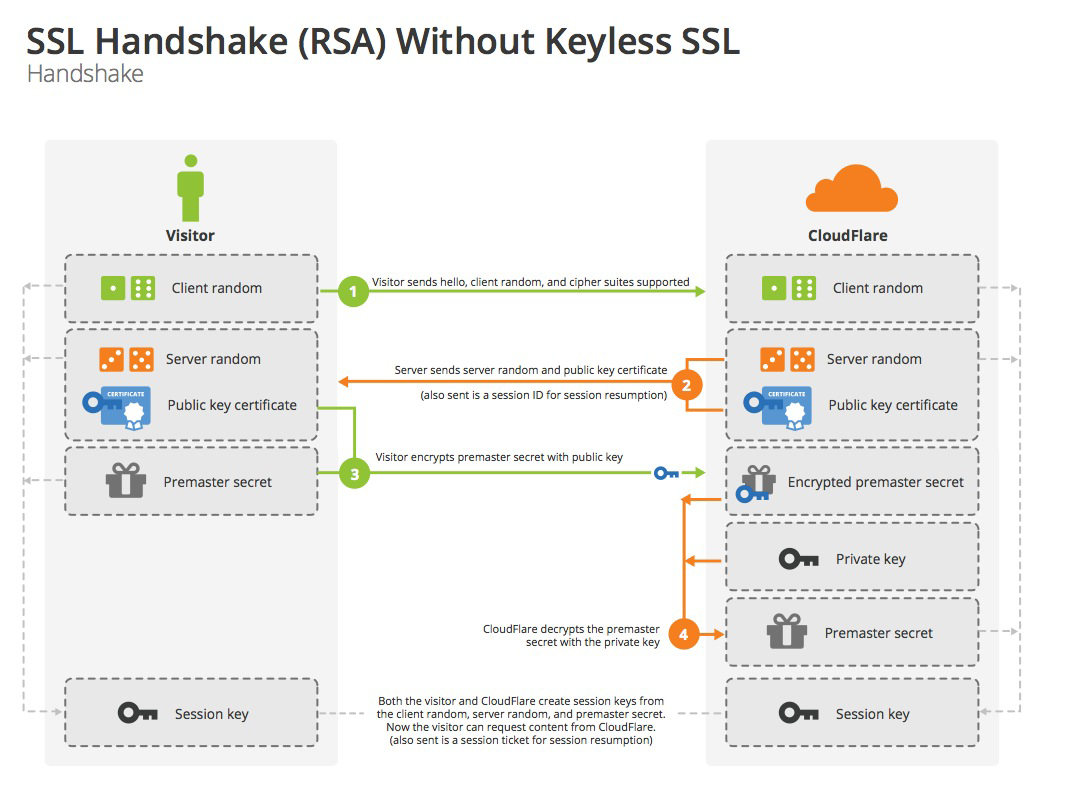
HTTPS(Http over Secure Socket Layer) 是基于SSL加密的更安全的HTTP协议,默认端口443。SSL握手协议过程如下:
- 客户端的浏览器向服务器传送客户端SSL协议的版本号,加密算法的种类,产生的随机数,以及其他通讯所需要信息。
- 服务器向客户端传送SSL协议的版本号,加密算法的种类,随机数以及其他相关信息,同时服务器还将向客户端传送自己的证书。
- 客户端利用服务器传过来的信息验证服务器的合法性,服务器的合法性包括:证书是否过期,发行服务器证书的CA是否可靠,发行者证书的公钥能否正确解开服务器证书的“发行者的数字签名”,服务器证书上的域名是否和服务器的实际域名相匹配。
- 客户端随机产生一个用于后面通讯的“对话密钥”,然后用服务器的公钥(从步骤2中的服务器的证书中获得)对其加密,然后传给服务器。
- 服务器用私钥解密“对话密钥”(此处的公钥和私钥是对应的,公钥加密的数据只能用私钥解密,服务器私钥只在服务器端保留),然后用其作为服务器和客户端的“通话密码”加解密通讯。具体的加密算法详见RSA加密算法。
- SSL的握手部分结束,SSL安全通道的数据通讯开始,客户和服务器开始使用对话密钥进行数据通讯,同时进行通讯完整性的检验。
SSH
SSH(Secure Shell)协议,专为远程登录会话提供安全性的协议,传输的数据都进行了加密。SSH提供两种级别的安全验证,第一种是基于口令的安全验证。第二种是基于密匙的安全验证,不需要传输口令,原理同 SSL 类似。下面介绍一下 SSH 基于密钥的安全验证。
客户端创建一对密钥(公钥和私钥),公钥存放在服务器上的 authorized_keys 文件中,当你想通过 ssh 远程连接服务器时会进行公钥比对。如果一致,服务器就用公用密匙加密“质询”(challenge)并把它发送给客户端。客户端收到“质询”之后就可以用你的私钥解密再把它发送给服务器。
SSH 通过密钥连接服务器步骤如下:
- 在本地执行
ssh-keygen生成配对密钥,在你的~/.ssh目录下会生成两个文件,id_rsa私钥,id_rsa.pub公钥。 - 将公钥拷贝到服务器的
~/.ssh/authorized_keys文件中。 - 使用
chattr +i authorized_keys命令给authorized_keys增加不可修改、删除的权限。 - 在本地使用
ssh {username}@{ip}连接服务器。第一次连接会询问你是否继续,选择 yes 则将连接信息添加到~/.ssh/known_hosts文件中,此后连接不再询问。